Unlock the full potential of your FDM 3D printer and learn about the intricate process behind the technology
Welcome to the World of 3D Printing
Hey there, tech enthusiasts! Are you ready to dive into the fascinating world of 3D printing? If you’ve ever wondered how an FDM 3D printer works and how to make the most of this fantastic technology, you’ve come to the right place. In this comprehensive guide, we’ll explore the ins and outs of FDM 3D printers, giving you the knowledge you need to become a 3D printing pro.
Section 1: FDM 3D Printing – The Basics
1.1 What is FDM 3D Printing?
FDM (Fused Deposition Modeling) is a popular additive manufacturing technology that uses a thermoplastic filament to create objects layer by layer. It’s a versatile and cost-effective process that allows for the creation of complex and intricate designs. With FDM 3D printing, the possibilities are endless!
1.2 Key Components of an FDM 3D Printer
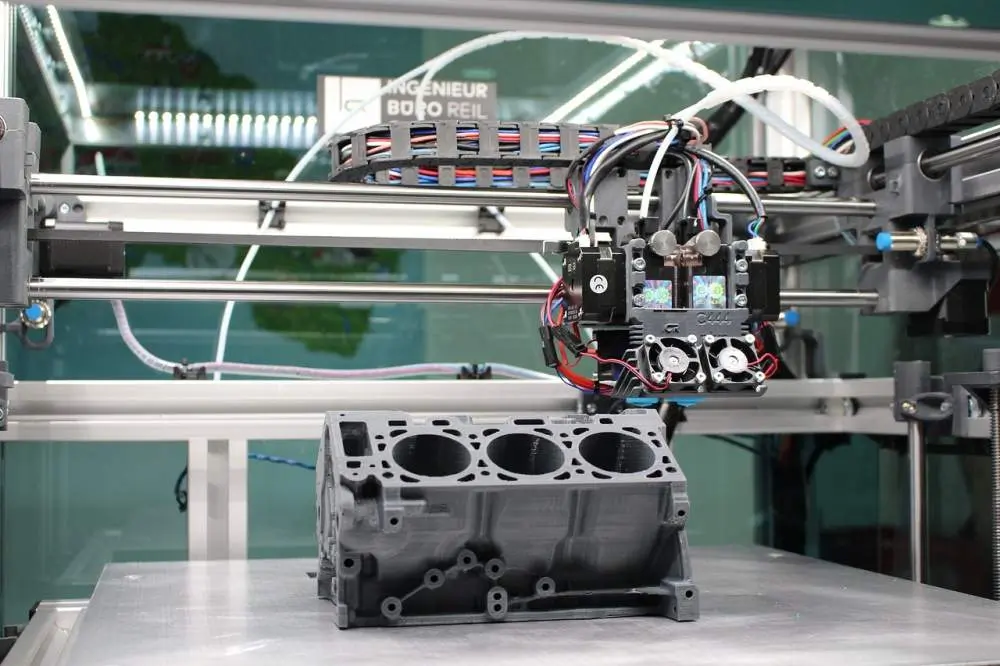
There are several essential parts to an FDM 3D printer:
- Print bed: The flat surface where the object is printed
- Extruder: The part that heats and melts the filament, allowing it to be deposited onto the print bed
- Filament: The thermoplastic material used for printing
- Stepper motors: Responsible for moving the extruder and print bed along the X, Y, and Z axes
- Control board: Manages the printer’s functions and communication with the user
1.3 The FDM Printing Process – From Digital Model to Physical Object
The process of FDM 3D printing starts with a digital 3D model, which can be created using computer-aided design (CAD) software or downloaded from an online repository. The 3D model is then sliced into layers using slicing software, which generates G-code instructions for the printer to follow.
The printer heats the filament, and the extruder deposits it onto the print bed, creating a layer. The extruder moves along the X and Y axes, while the print bed moves along the Z-axis. This process is repeated, building the object layer by layer until it’s complete.
Section 2: FDM 3D Printing Materials – PLA, ABS, and Beyond
2.1 The Most Common FDM 3D Printing Filaments
Two of the most widely used filaments in FDM 3D printing are PLA (Polylactic Acid) and ABS (Acrylonitrile Butadiene Styrene). PLA is biodegradable and made from renewable resources, making it an eco-friendly option. It’s also easy to work with and has a low melting temperature. ABS, on the other hand, is more durable and heat-resistant but requires a heated print bed and proper ventilation due to fumes.
2.2 Specialized Filaments for Unique Applications
Apart from PLA and ABS, there are several specialized filaments available for unique applications:
- PETG: A strong and flexible filament that’s easy to print, making it suitable for mechanical parts
- Nylon: A highly durable and wear-resistant material, perfect for functional prototypes and mechanical parts
- TPU/TPE: Flexible and stretchy materials, ideal for printing gaskets, seals, and wearable items
- Wood-infused PLA: Combines PLA with wood particles, giving a wood-like appearance to printed objects
2.3 Choosing the Right Filament for Your Project
When selecting a filament, consider factors such as the desired strength, flexibility, and appearance of the final object, as well as the printing environment and any specific requirements for your project. Be sure to test and experiment with different materials to find the perfect match for your needs.
Section 3: Optimizing Your FDM 3D Printer Settings
3.1 Layer Height, Infill, and Print Speed
To optimize the quality and strength of your 3D printed objects, it’s crucial to understand and adjust various printer settings:
- Layer height: A smaller layer height provides better resolution and surface finish but increases print time. Choose a layer height based on the desired balance between quality and speed.
- Infill: The percentage of the object’s interior that’s filled with material affects its strength and weight. Higher infill percentages create stronger objects but use more material and increase print time.
- Print speed: Faster print speeds can reduce print time but may compromise the quality and accuracy of the final object. Experiment with different speeds to find the optimal balance.
3.2 Temperature, Cooling, and Bed Adhesion
Temperature control is vital for successful FDM 3D printing:
- Extruder temperature: Too hot or too cold can cause issues such as stringing, oozing, or poor layer adhesion. Consult the recommended temperature range for your chosen filament and fine-tune as needed.
- Cooling: Ensure adequate cooling to solidify layers and prevent warping. Some materials, like ABS, may require less cooling to maintain proper layer adhesion.
- Bed adhesion: A heated print bed can improve adhesion and prevent warping. Consider using adhesion aids such as painter’s tape, glue sticks, or specialized print surfaces to enhance bed adhesion.
3.3 Troubleshooting Common FDM 3D Printing Issues
Encountering issues during 3D printing is common. Here are some common problems and possible solutions:
- Warping: Occurs when the printed object’s edges lift off the print bed. Improve bed adhesion, use a heated bed, or adjust cooling settings to resolve this issue.
- Stringing: Thin strands of filament are left between separate parts of the print. Fine-tune retraction settings, adjust temperature, or reduce print speed to minimize stringing.
- Layer shifting: Misaligned layers in the printed object. Check for loose belts or pulleys, ensure smooth movement of the printer’s axes, and reduce print speed if necessary.
Section 4: Post-Processing Techniques for FDM 3D Printed Objects
4.1 Sanding and Smoothing Techniques
To achieve a smooth and professional finish on your FDM 3D printed objects, consider sanding and smoothing techniques:
- Sanding: Start with coarse grit sandpaper and gradually move to finer grits. Sand in circular motions and be gentle to avoid removing too much material.
- Wet sanding: For a smoother finish, wet sanding with water or a sanding lubricant can help reduce friction and prevent scratches.
- Smoothing with chemicals: For materials like ABS, acetone vapor smoothing can create a glossy, polished surface. This method involves exposing the printed object to acetone vapor, which melts the surface and smooths it out.
4.2 Painting and Finishing Options
Enhance the appearance of your 3D printed objects with painting and finishing techniques:
- Priming: Apply a primer before painting to ensure better adhesion and a smoother surface.
- Painting: Use acrylic, enamel, or spray paints to add color and detail to your printed objects. Apply thin, even layers and allow each layer to dry before adding another.
- Clear coating: Protect your painted objects with a clear coat or varnish for added durability and a glossy finish.
4.3 Advanced Post-Processing Methods
For advanced users, explore additional post-processing techniques:
- Electroplating: Add a thin layer of metal to your 3D printed objects for enhanced strength, durability, and aesthetics. This process involves immersing the object in a metal salt solution and applying an electric current to coat it with the desired metal.
- Vapor polishing: For materials like polycarbonate, vapor polishing with solvents can create a smooth and transparent finish. Similar to acetone vapor smoothing, this technique involves exposing the object to the appropriate solvent’s vapor, which melts and smooths the surface.
- Support removal: For objects printed with support structures, carefully remove the supports using pliers, a hobby knife, or other tools. Sand or smooth any remaining rough areas for a clean finish.
Conclusion: Elevate Your FDM 3D Printing Game
By understanding the intricacies of FDM 3D printing, you can unlock the full potential of this incredible technology. From optimizing your printer settings to mastering post-processing techniques, every detail matters. Armed with this knowledge, you’re ready to elevate your FDM 3D printing game and create stunning, high-quality objects for any purpose.


